Archive | dessert RSS feed for this section

So Many Carrots Carrot Cake Cupcakes

11 Jul

Calling all sweet teeth.

Calling all sweet teeth.

What do you do when your man buys a five-pound bag of carrots (because he was on a carrot kick), but is unable to consume them fast enough, thus leaving the produce drawer filled with root vegetables on the verge of ruin?

Have you guys met my boyfriend?

Have you guys met my boyfriend?

Some less neurotic souls might let the carrots falter and move on with their lives. But not Aunt B. Because throwing away food makes me irrationally miserable.

So, instead, I made and froze a huge vat of carrot soup, which I plan to consume when it’s not surface-of-the-sun hot outside (recipe coming later), shredded multiple bags of carrots for salads, and whipped up way more carrot cake cupcakes than a household of two requires.

This was not only my first vegan carrot cake, but my first carrot cake attempt period, and also my first go at homemade frosting. So I was a little wary. Luckily, I followed two fantastic recipes from Jannequin Bennet’s “The Complete Vegan Kitchen,” a birthday present from my lovely friend Alex (thanks, Al!), and all was well.

Based on the ingredients I had on hand, I had to make a few slight alterations. But the end result was delightful. These little cakes are not only really moist and flavorful — they’re also a yummy, cool treat on a hot day when you eat one right out of the fridge. Plus, making tiny, adorable frosting carrot decorations was super fun.

Not-a-Pro-Tip: Don’t have a piping bag? No problem. Fill up a sandwich bag with icing and cut off one of the corners. Bingo. You are now authorized to ice.

Big ups to my main squeeze, Miles Pfefferle, for taking pics of my food and really liking carrots. Smooch.

Carrot Cake Cupcakes
Makes 18 cupcakes (or two 9-inch round cakes or one 9×13-inch cake)

Ingredients

  • 1 3/4 cup whole wheat flour
  • 1/2 cup chickpea flour (Ms. Bennet calls for soy flour)
  • 1/4 cup shredded coconut
  • 3/4 cup walnuts
  • 1/2 tsp sea salt
  • 1 1/2 tsp baking powder
  • 1 tsp ground cinnamon
  • 1/4 allspice
  • 1 tsp lemon juice (Ms. Bennet uses the zest of one lemon)
  • 3 Tbsp apple sauce (or canola oil)
  • 1 cup maple syrup
  • 1/4 cup molasses
  • 1/4 cup raisins
  • 2 1/2 cups grated carrots (I shredded and the diced mine in a food processor because ain’t nobody got time for grating)

Patty cake, patty cake, baker people…

  1. Preheat your oven to 350 degrees Fahrenheit.
  2. Spray your cupcake pan (or cake pans).
  3. In a large mixing bowl, combine all the dry ingredients and mix well.
  4. In another bowl, combine the raisins, carrots and liquids, and whisk until the mixture is light and bubbly.
  5. Combine the two mixtures (dry and wet) in one bowl, and stir until just combined. Be sure not to over mix.
  6. Spoon the batter evenly into your cupcake wells, and bake for 20 minutes (30 to 40 if you’re making a cake).
  7. Let the cupcakes cool in the pan for a couple minutes, then carefully flip the pan over and dump them out onto a plate to finish cooling.
  8. Once they’re cool, frost them with the recipe below…

Tofu Walnut Frosting

Ingredients

  • 1/4 cup + 2 Tbps walnuts
  • 1/2 pound tofu, drained
  • 2 Tbsp + 2 tsp maple syrup
  • 2 Tbsp shredded coconut
  • 1/2 Tbsp vanilla

How to frosting

  1. Whir the walnuts around in a food processor until they’re a fine powder.
  2. Add the tofu and blend until combined.
  3. Add the maple syrup, coconut and vanilla and blend until combined.
  4. If the frosting seems too thick, add in a little almond or soy milk.
  5. Let the frosting cool off in the fridge for a few minutes before use.

Note: If you’re frosting two 9-inch round cakes or one 9X13-inch cake, double the amounts above.

Bon appétit!

High time for vegan strawberry rhubarb pie time

31 May

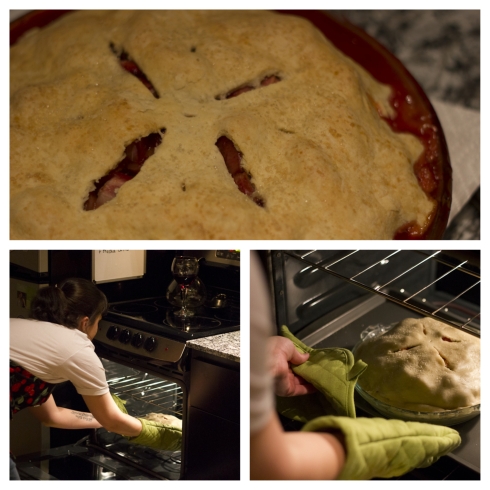
It's high time for pie time, ya'll.

It’s high time for pie time, ya’ll.

She lives!

It’s true. I am back, and I bear a delicious, pie-shaped apology for my long absence.

My hiatus was due to an abrupt, but destined, across-the-continent move from Chicago to my new home base: the lovely and not-as-rainy-as-you’ve-been-lead-to-believe Portland, Oregon! Check it out on that Vine thing the kids are talking about.

From where I stand, PDX is the vegan home planet. I haven’t even been here a month, and I’ve already discovered so many veg-focused and veg-friendly nosh spots that I am equally concerned for my waistline and wallet. The Steve Caballero at Sizzle Pie is currently tied with the vegan bratwurst at the Altengartz food cart for my favorite treat.

But I’ll save the Stumptown deets for later. For now, let’s talk pie.

Pie is yummy.So, you want to make a vegan strawberry rhubarb confection, do you? Of course you do. It tastes like summer with sugar sprinkled on top. Plus, it makes a great breakfast (IMHP).

Here’s what you need:

Filling Ingredients

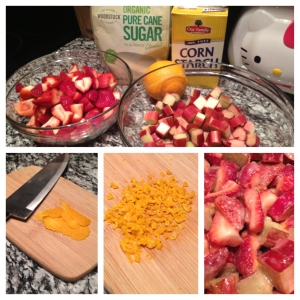
  • About 1 1/2 lbs of  strawberries, hulled and quartered (two of the 16 oz. containers)
  • About 1 1/2 lbs of rhubarb, chopped into bite-size bits (about three foot-long stalks)
  • 1 cup sugar
  • 5 Tbsps arrowroot powder (or good old cornstarch, if you’re me)
  • 1/4 tsp vanilla
  • A pinch (pronounced: peeeeench) of sea salt
  • 2 tsps orange zest
  • Additional 1 tsp of sugar (for sprinkling)

Crust Ingredients

  • 2 1/4 cups all-purpose flour
  • 1/2 cup solid coconut oil
  • 1 Tbsp sugar
  • 1 tsp sea salt

How to Pie

Zestfully Clean!

No, not this kind of Zest. But weren’t these commercials inspiring?

First of all, I misplaced my zester in the move, so here’s a little bonus tutorial on how to zest a citrus fruit without a grater or a zester (You’re welcome):

  1. Use a sharp knife to peel a few strips of the rind off the fruit. Try your best not to get the white part, as that has a bitter taste. You just want the colorful bit.
  2. Chop up the rind as fine as you can.
  3. That’s it. You’ve made zest.

For further instructions on the filling, and pie assembly, check out the original recipe here from Mattie on veganbaking.net.

But for the crust, I recommend this simple, and super tasty gem from Gene Hemshaw on food52.com. It’s crazy simple to make, especially if you’re blessed with a food processor. It really is the perfect vegan pie crust.

Now that I have a kitchen again, I promise that more recipes from me are on the way. But for now, Bon appetit!

Also, a special thanks to my love, Miles Pfefferle, for capturing pie time with his Canon. xo.

The amazing chocolate peanut butter cup cookies, plus a Twitter tip

21 Feb

Nomnomnom.

Only the best cookies ever.

Beware, folks. These cookies may be vegan, but they sure aren’t diet food.

If you ever spent a candy-full holiday hoarding Reese’s Peanut Butter Cups, these rich little gems are going to rock your sweet tooth hard.

The recipe comes from the cookbook Vegan Cookies Invade Your Cookie Jar, with slight alterations, and is so fantastically simple and fast (especially with the aid of a food processor) you might find yourself making more batches than your waistline cares for. Just hide the scale now, that’s all I’m saying.

Makes 24 life-changing cookies

Chocolate Dough Ingredients

  • 1/2 cup canola oil
  • 1 cup sugar
  • 1/4 cup pure maple syrup
  • 3 Tbsps non-dairy milk (I used unsweetened almond milk)
  • 1/2 tsp pure vanilla extract
  • 1 1/2 cups all-purpose flour
  • 1/2 cup unsweetened cocoa powder
  • 1/2 tsp baking soda
  • 1/4 tsp sea salt

Peanut Butter Filling Ingredients

  • 3/4 cup crunchy or creamy natural salted peanut butter (or you can use unsalted and throw a pinch of sea salt into the batter)
  • 2/3 cup powdered sugar
  • 2 to 3 Tbsp non-dairy milk
  • 1/4 tsp pure vanilla extract

C is for Cooookies!

  1. Place the oil, sugar, maple syrup, milk, and vanilla in a food processor and process until smooth (or mix the ingredients in a large bowl).
  2. Combine the flour, cocoa powder, baking soda and salt, and gradually add the mix to the processor (or bowl), until a moist lump of dough forms.
  3. Dump the chocolate dough out onto a cutting board, bowl or clean counter and set aside.
  4. To make the peanut butter filling, process the peanut butter, powdered sugar, 2 Tbsps of milk, and vanilla until a moist, firm dough forms (if you are food-processor-less, use a hand mixer in a large mixing bowl). If your dough is dry and crumbly, add in the remaining tablespoon of milk. If it’s too wet, add in a bit more powdered sugar.
  5. By now your work space should smell amazing. Stop and appreciate that, then preheat your oven to 350 degrees, and line two baking sheets with parchment paper.
  6. Create the peanut-buttery soul of the cookies by rolling the peanut butter dough into twenty-four equal-sized balls. Tip: divide the dough in half, then divide each part in half again. Use those four chunks to make six balls each.
  7. To form your cookies, flatten about a tablespoon of the chocolate dough on your palm, and place a peanut butter ball in the center.
  8. Gently wrap the chocolate dough around the peanut butter center and roll it between your palms, smoothing any cracks, until you have a smooth ball of yumyum.
  9. Place all 24 dough balls about two inches apart on your lined baking pans, and pop them in the oven (one sheet at a time) for 10 minutes.
  10. Let the cookies stand for five minutes before scarfing them down…or moving them to wire racks or a plate to cool off.
  11. If you can somehow resist eating them all in one sitting, make sure you store these guys in an airtight container or plastic bag so they don’t dry out. Because that would be a damn tragedy.

Bon appetit!

Next week, I promise you some tasty tacos. You can thank my wonderful friend Maggie for requsting that recipe.

Until then, I leave you with this Twitter tip: If you are a Seinfeld fan, you must immediately follow Modern Seinfeld @SeinfeldToday. It’s a series of episode descriptions as if the show were still in production. Just imagine the shenanigans the gang could get into with iPhones, planking, hipster culture, etc. Enjoy!

Avocadopalooza: Creamy Pasta and Chocolate Pudding

30 Jan

Avocadomania: Creamy avocado pasta and chocolate pudding.

No butter. No milk. No cream. No kidding.

Avocados are not just for face masks and guacamole, people. In fact, this smoothtastic and B-vitamin-filled Mexican berry (true story, look it up) was the foundation of my delicious dinner and dessert last night: creamy avocado pasta and chocolate pudding. I also had a salad, so you can stop judging my fatty ways right now, judgy.

Cos approved.

Mr. Cosby may or may not be eating my pudding in this picture.

Before you get all freaked out and walk away from this blog while shaking your head, know that you can’t taste avocado in the pudding. Not at all. It tastes just like chocolate pudding should taste: glorious. Trust me, Mr. Cosby would approve.

You should also know that the best thing about both of these dishes, outside of the fact that they taste crazy good, is that you can throw them together super-fast and they don’t require much effort beyond turning on a food processor.*

And now…to the deets!

Creamy Avocado Pasta
Serves 2

I adapted this recipe, with only slight changes, from the fabulous Angela of Oh She Glows blog fame. My most serious recommendation: stick to one or two cloves of garlic. The original recipe calls for three cloves but, while I loves me some garlic, three left me with vampire-repelling breath. What if Edward had come calling?!

Ingredients

  • 1 ripe avocado, pitted and diced
  • 1 Tbsp lemon juice
  • 1 to 2 garlic cloves
  • 1/2 tsp sea salt
  • 1/4 cup fresh basil (or a few shakes of dried basil, in my case)
  • 2 Tbsp olive oil
  • 6 oz of pasta (I used whole wheat linguini)
  • Ground black pepper, to taste

Pasta it UP

  1. Cook your pasta according to the box instructions.
  2. While your pasta is cooking, blend the garlic, lemon juice and olive oil in a food processor until you get a smooth mixture (and you don’t see any garlic bits).
  3. Add the avocado, basil, and salt to the mix and blend until it’s all one creamy dream.
  4. Drain your cooked pasta and transfer it to a large bowl before pouring on the sauce and tossing until it’s fully combined.**
  5. Grind some black pepper onto your creation.
  6. Devour.

**Angela notes that the avocado causes this dish to not reheat well. But because leftovers are a very important part of my very unimpressive life, I had to develop a fix: set aside some of the sauce and some of the cooked noodles in separate containers and refrigerate both. When you want to nosh on your second helping, heat up the noodles by adding a little water (not too much or your final product will be soupy) to the container and pop it in the microwave for a minute or so, and then toss the pasta with the sauce. Voila!

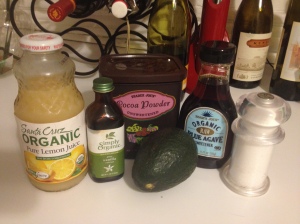
Pudding ingredients

All you need for puddin’.

Chocolate Avocado Pudding
Serves 2 (yeah, right)

This miracle of a recipe comes from the awesome team at The Centered Chef in Chicago, where I took a deliciously informative (and BYOB!) Vegan 101 cooking class last week. If you live in the area, I highly recommend signing up for a session. They also offer a vegan baking class that I’m game to try whenever the funds magically appear in my bank account.

More recipes from that experience are on the way. Scout’s Brownie’s honor.

Ingredients

  • 1 ripe avocado, pitted and diced
  • ¼ cup agave nectar
  • ¼ cup cocoa powder
  • ¼ cup water
  • 2 tsp. vanilla extract
  • ¼ tsp. sea salt
  • ½ Tbsp lemon juice (or to taste)

Pudding Time

  1. Dump your avocado bits, agave nectar, cocoa powder, vanilla extract and sea salt (yep, all of it) in a blender or food processor and blend away.
  2. Gradually add water until your pudding looks like, well, pudding.
  3. Stop the processor and make sure all of the cocoa powder is scraped off the sides and into the mix, and keep mixing until all the avocado bits are broken up.
  4. Scrape up every last bit of that chocolatey goodness, and set in the refrigerator for about an hour to chill.
  5. Do your best not to eat all of it in one sitting. Good luck!

Bon appetit!

* On a final note, it has come to my attention that I require a new food processor. Mine was a hand-me-down from my grandmother and, while it has lived a fine life, it’s now older than I am and not quite up to snuff. Any recommendations from the peanut gallery on a new appliance that won’t put me in the poor house would be greatly appreciated.

Heaven is a place with blueberry walnut banana bread

7 Jan

Vegan blueberry walnut banana bread.

I will make your kitchen smell divine

Has a bite of food ever made you want to weep with joy? No? Well, in that case, I feel bad for you. And also, I recommend you make my world famous (okay, my garden apartment famous) blueberry walnut banana bread.

Even if you don’t bawl from sheer tastebud delight, you’ll probably at least want to give yourself a hug after you taste your first slice.

I like to think it’s the addition of maple syrup that vaults this loaf from merely “yummy” to “I’ll punch a room full of babies for another piece” status.

On that note…Bon appetite, my future fellow would-be baby punchers!

Ingredients

Photo Jan 05, 6 31 21 PM

Get ready to mush.

  • 1 cup whole wheat flour
  • 1/2 cup pastry flour
  • 2 tsps baking powder
  • 1 tsp sea salt
  • 1/2 cup organic, raw sugar
  • 2 Tbsps ground flax, plus 1/4 cup hot water (this here is our egg replacer)
  • 3 ripe bananas
  • 1 tsp vanilla
  • 1/2 cup unsweetened almond milk
  • 1/2 cup chopped walnuts
  • 1 big ole’ cup frozen blueberries
  • 1 tsp ground cinnamon
  • 1 Tbsp organic, pure maple syrup
  • A smidgen of love and dollop hope and a dash of dreams (Just playing. Use as much of these as you want).

Get your loaf on…

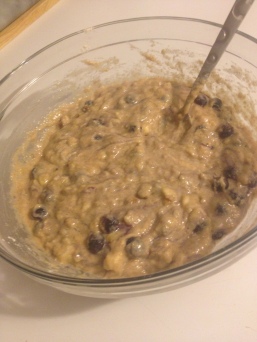
Photo Jan 05, 6 44 54 PM

Just try to resist eating me with a spoon.

  1. Preheat your oven to 350 degrees and grease a bread loaf pan.
  2. In a large mixing bowl, combine the flours, baking powder, salt, and sugar.
  3. In a small bowl, mix the ground flax with the hot water to make a “flax egg” and pop the mixture in the refrigerator for about 15 minutes. This helps it thicken up for its egg duties.
  4. In another small bowl, mash the bananas before stirring in the almond milk, maple syrup and vanilla. If the thought of biting into warm banana bits as you enjoy your bread sounds as yummy to you as it does to me, leave a few lumps.
  5. Pour the wet ingredients into the dry, and mix until just combined. Note: If you over-mix your bread it will get tough, and not in the good Chuck Norris sense.
  6. Fold in the walnuts and blueberries.
  7. Resist the urge to just say “to hell with it,” and eat all the batter with a spoon. Instead, pour the mixture into the bread pan and shake it a little to even it out.
  8. Pop it in the oven for an hour to 75 minutes.
  9. To make sure the loaf has cooked through, poke the middle of the loaf with a toothpick or knife. If it comes out clean, you’re golden. Now stay that way, pony boy.

Warning: This bread is highly coveted and disappears quickly in my household. In fact, I’m off to hide the remainder of my latest loaf in a locker at Union Station. Later.

Milking Almonds

100% plantbased food 4 life

A Veganable Feast

My personal answer to the question, "Vegan? Really?? But what do you eat?!" ********************************************* Follow me on facebook at https://www.facebook.com/AVeganableFeast

What's Your Healthy

FEEL YOUR BEST

meatyveganblog.wordpress.com/

Check it out! TheSkepticalVegan.com

Better Bites

My experiments in healthy eating, cooking, and living

Gluten Free Gus

Baking Joy Into Every Gluten-free Bite

Awesome Åshild

Did You Do A "Something Every Day" Today?

Gabriel Lucatero

The Official Website

amythevegan

I'm smarter than a 3rd grader but no one will believe me.

cancer killing recipe

Inspiration for meeting life's challenges.

FlexibleVegan

Fast, Easy and Healthy! It can't get easier than this.

Awesome. Vegan. Blog.

Dedicated to health and wellness!

Vegan in Cleveland

Vegan recipes and restaurant reviews from Cleveland

The Pint-Sized Pantry

A repertoire of recipes for the cramped cook.