Archive | snack RSS feed for this section

Un-crabby Cakes with Ritz Crackers

17 Jan

Not pictured: drool.

Not pictured: drool.

Sure, I could have used a fork to crush the crackers. But this was so much more fun.

Did you know that Ritz Crackers are vegan? It’s true. I’m not saying they are in any way nutritious, in fact I’m sure they’re not, but goddamnit they are yummy and made of zero animal bits.

And sometimes, as Donna Meagle and Tom Haverford have taught me, you need to treat yo’ self.

That’s why I was so excited when, while scrolling through the resplendent sea of possibilities we call Pinterest, I happened upon this recipe for crab-cake balls made with Ritz.

“I can soooo sub out chickpeas for crab,” I said to myself, steepling my fingers like Mr. Burns, before adding the image to my “Make it Vegan Challenge” board. “This is going to be awesomesauce.”

And it really was.

In addition to subbing out the crab and egg, I also added in some veggies: onion and celery.

Un-crabby Cakes with Ritz Crackers
Serves 12

Ingredients

  • 1 can drained chickpeas
  • 1 vegan egg replacement (I used this chia-water goop)
  • 1 cup Ritz crackers, crushed
  • 1/2 small onion, diced
  • 1 celery stalk, diced
  • 1 tsp yellow mustard
  • 2-3 Tbsp fresh lemon juice
  • 2 Tbsp parsley
  • 1 tsp Old Bay seasoning
  • 1 Tbsp vegan Worcestershire sauce (if you don’t have any)

Bella and Leo were fooled by the seafood-like smell, and kept trying to sneak off with some cakes. Here they are post discipline, and rightly ashamed of themselves.

Directions

  1. Preheat your oven to 350 degrees.
  2. Crush drained chickpeas with a fork or potato masher in a large mixing bowl.
  3. Add crushed crackers, Old Bay, parsley, onion and celery to the chickpeas.
  4. In a separate bowl, combine your chia-water goop, mustard, lemon juice and Worcestershire sauce, and whisk until smooth.
  5. Pour the liquid mixture over the chickpea and cracker mix, and gently combine.
  6. Mold your mixture  into golf-ball sized lumps and bake on a cookie sheet covered with parchment paper  for 30 minutes. I also sprayed the balls lightly with some oil before baking, but you could skip that step if you want to stay oil free.

I can’t speak to how long these hold up in the fridge, because Miles and I (mostly me) ate them all within 24 hours. I can, however, tell you they are bomb-ass on salad — particularly when paired with the Deity Dressing from “Everyday Happy Herbivore” (pg. 128). So much noms.

Bon appétit! 
The vegan fried, dippity egg

15 Jun

Dip away, my dears. Dip away.

Dip away, my dears. Dip away.

This is real. And I'm so happy for all of us.

This is real. And I’m so happy for all of us.

I was wandering through a book store in Astoria not long ago, when I happened upon this gem: “Betty Goes Vegan” by Annie and Dan Shannon. Now, on account of recently moving across the country and having to re-buy pretty much everything a house needs, I’m broke. So I didn’t actually purchase the book just then (but I assure you all, I certainly will).

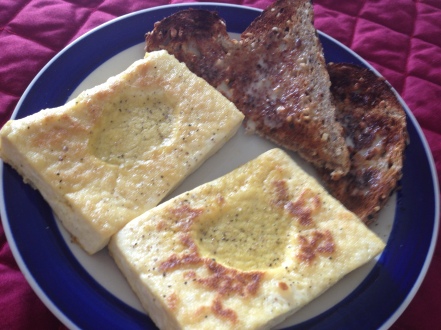
However, I did, while flipping through its magical pages, discover a dish I thought was out of my grasp forever when I gave up animal bits: the dippity fried egg.

You may know them as simply “over easy” or “sunny side up” eggs. But when I was growing up, on the rare occasions when my father would cook the only meal he ever cooked for us (breakfast), he usually made us fried eggs with ever-so-slightly pink yolks — perfect for little rugrats to dip toast into. We loved them and dubbed them dippity eggs. And dippity eggs they will forever be.

As you can probably imagine, I was beyond stoked to find this recipe. I may or may not have skipped across the shop, shoved the book up to Miles’ nose and said the phrase, “lookey lookey!” Despite my lack of funds, I had to get these non-eggs into my belly ASAP.

And so I did.

Ron Popeil sold me through quite a few bouts of insomnia once upon a time.

Ron and his rotisserie got me through quite a few bouts of insomnia once upon a time. Not pictured: Flavor injector.

Annie and Dan’s recipe calls for a flavor injector, a slightly wacky device that some of you might recall from the late-night countertop rotisserie commercials starring Ron Popeil. I know I do. Only instead of pumping a bird’s carcass full of marinade, the Shannons use this little doohickey to pump their yolk replacement (a vegan cheese sauce) into the middle of a tofu block. Ingenious.

Unfortunately, while I’ve placed an order for my very own flavor injector (of course), I was not patient enough to wait for it to arrive before attempting these tofeggs. Instead, I scraped out a couple little craters in my pressed tofu blocks, and filled them with my own yolk sauce (recipe and instructions below). And, my friends, I was not disappointed.

I think the key to the yolk sauce success is black salt. While not aptly named (it’s really more of a reddish brown), it’s eggy, sulfurous smell and taste are pretty much perfect for this application. I got mine off of Amazon, but you might be able to unearth some at an Indian market or health foods store.

In fact, my little dippity tofeggs were amazing, and now that I have a ready supply of yolk sauce, I plan to make them all the time. I hope you like ’em too!

Vegan Dippity Fried Eggs
Makes 4 Eggs

Mmm. Eggy salt.

Mmm. Eggy salt.

Ingredients

  • 2/3 16-oz. block of organic, extra firm tofu, pressed
  • 2 Tbsps olive oil
  • Four spoonfuls of vegan yolk sauce (below)
  • A pinch of black salt

Vegan Yolk Sauce Ingredients

  • 1/2 cup almond milk
  • 1/4 cup nutritional yeast
  • 2 1/2 tsps vegan butter (as always, I rock the Earth Balance)
  • 1/2 tsp Dijon mustard
  • 1/4 to 1/2 tsp black salt
  • 1/4 tsp garlic powder
  • 1/4 tsp onion powder
  • 1 tsp flour (I used Bob’s Red Mill gluten free)
  • A dash of turmeric (or until it’s as yellow as you like)

To make the sauce, place all the ingredients (minus the tofu, naturally) in a blender or food processor and pulse until you have a smooth liquid. You’ll have some left over. Store that in an airtight container in the fridge for your next batch of fried dippity eggs.

Two little tofeggs, getting ready for the skillet.

Two little tofeggs, getting ready for the skillet. And, also, a little bit of my thumb. My bad.

Get Ready to Get Dippity!

  • Preheat your oven to 350 degrees.
  • Cut your block of pressed tofu into thirds, set one third aside for other use, and then cut the leftover two blocks in half, length-wise. What you want in the end is four rectangles of tofu that are roughly the size of a fried agg and about 1/2-inch thick.
  • Take a spoon and carve out little yolk craters on each of the tofu blocks. Be careful not to dig through the tofu, or your yolk sauce will escape!
  • Heat the olive oil on medium heat in a cast-iron skillet until it crackles when you toss a drop of water in. Then fry your tofeggs, flipping over occasionally until they start to brown and crisp.
  • Sprinkle the tofeggs with a pinch of black salt.
  • Now, spoon some of your yolk sauce into crater of each egg, and place the skillet on the bottom rack of the oven for about three minutes to set the “yolks” up.
  • Scoop them out of the pan and onto a plate, and serve with some toast for dipping!

Bon appetit!

The amazing chocolate peanut butter cup cookies, plus a Twitter tip

21 Feb

Nomnomnom.

Only the best cookies ever.

Beware, folks. These cookies may be vegan, but they sure aren’t diet food.

If you ever spent a candy-full holiday hoarding Reese’s Peanut Butter Cups, these rich little gems are going to rock your sweet tooth hard.

The recipe comes from the cookbook Vegan Cookies Invade Your Cookie Jar, with slight alterations, and is so fantastically simple and fast (especially with the aid of a food processor) you might find yourself making more batches than your waistline cares for. Just hide the scale now, that’s all I’m saying.

Makes 24 life-changing cookies

Chocolate Dough Ingredients

  • 1/2 cup canola oil
  • 1 cup sugar
  • 1/4 cup pure maple syrup
  • 3 Tbsps non-dairy milk (I used unsweetened almond milk)
  • 1/2 tsp pure vanilla extract
  • 1 1/2 cups all-purpose flour
  • 1/2 cup unsweetened cocoa powder
  • 1/2 tsp baking soda
  • 1/4 tsp sea salt

Peanut Butter Filling Ingredients

  • 3/4 cup crunchy or creamy natural salted peanut butter (or you can use unsalted and throw a pinch of sea salt into the batter)
  • 2/3 cup powdered sugar
  • 2 to 3 Tbsp non-dairy milk
  • 1/4 tsp pure vanilla extract

C is for Cooookies!

  1. Place the oil, sugar, maple syrup, milk, and vanilla in a food processor and process until smooth (or mix the ingredients in a large bowl).
  2. Combine the flour, cocoa powder, baking soda and salt, and gradually add the mix to the processor (or bowl), until a moist lump of dough forms.
  3. Dump the chocolate dough out onto a cutting board, bowl or clean counter and set aside.
  4. To make the peanut butter filling, process the peanut butter, powdered sugar, 2 Tbsps of milk, and vanilla until a moist, firm dough forms (if you are food-processor-less, use a hand mixer in a large mixing bowl). If your dough is dry and crumbly, add in the remaining tablespoon of milk. If it’s too wet, add in a bit more powdered sugar.
  5. By now your work space should smell amazing. Stop and appreciate that, then preheat your oven to 350 degrees, and line two baking sheets with parchment paper.
  6. Create the peanut-buttery soul of the cookies by rolling the peanut butter dough into twenty-four equal-sized balls. Tip: divide the dough in half, then divide each part in half again. Use those four chunks to make six balls each.
  7. To form your cookies, flatten about a tablespoon of the chocolate dough on your palm, and place a peanut butter ball in the center.
  8. Gently wrap the chocolate dough around the peanut butter center and roll it between your palms, smoothing any cracks, until you have a smooth ball of yumyum.
  9. Place all 24 dough balls about two inches apart on your lined baking pans, and pop them in the oven (one sheet at a time) for 10 minutes.
  10. Let the cookies stand for five minutes before scarfing them down…or moving them to wire racks or a plate to cool off.
  11. If you can somehow resist eating them all in one sitting, make sure you store these guys in an airtight container or plastic bag so they don’t dry out. Because that would be a damn tragedy.

Bon appetit!

Next week, I promise you some tasty tacos. You can thank my wonderful friend Maggie for requsting that recipe.

Until then, I leave you with this Twitter tip: If you are a Seinfeld fan, you must immediately follow Modern Seinfeld @SeinfeldToday. It’s a series of episode descriptions as if the show were still in production. Just imagine the shenanigans the gang could get into with iPhones, planking, hipster culture, etc. Enjoy!

Facon bacon melty breakfast sammich

7 Feb

Melty facon sammie

You don’t need to eat both of us, but you will. Oh yes, you will.

No one, my usually petulant self included, disputes the value of a good breakfast. It stokes your metabolic coals and makes you a bit less likely to eat that entire box of jelly donuts you will later stumble upon in the break room.

In fact, if you want to avoid heart disease, obesity and diabetes, you’d best nosh after you roll out of bed. Here’s some science on the subject, for all you nerds.

My only problem with the most important meal of the day is this: who has time to actually cook something delicious in the a.m., much less to sit down and consume it? Not this lady.

On a typical weekday morning (when I am deprived of the time to indulge in frittata or biscuits and gravy), I usually grab a piece of fruit, slather some peanut butter on a piece of toast and try not to drop it yummy-side down on the floor. And I do this all whilst I hop out the door, simultaneously pulling on pants and struggling to keep a good grip on my car keys clenched between my teeth. I am what they call a disaster “multi-tasker.”

While PB on toast with a side of banana is pretty good, it’s no breakfast of champions. Am I right, Mr. Vonnegut?

Enter the mighty breakfast sandwich, savior of the morning meal.

This here incarnation consists of splendidly good-for-you tempeh facon bacon, on a bed of fresh spinach leaves, sprinkled with some Daiya vegan mozzarella, and perched on a whole wheat homemade biscuit or English muffin drizzled with vegan mayo. This would probably also be good with a slice of tomato, if you dig tomatoes, and I’d love to try it with cheddar versus mozzarella.

Not only is this dish warm and savory, it’s also blessedly fast, easy to assemble, and portable. Plus it needn’t contain chicken, pig or cow products in order to provide you with plenty of protein, fiber, vitamins, and satisfaction in having dragged your butt out of bed.

Everyone's fav Mayonnaise.

Of course, everyone’s favorite Mayonnaise is Patty.

I bought my vegan mayonnaise at the store, but when I run out I plan to make more with one of these recipes.

To keep your breakfast sammich process as quick and easy as promised above, make your facon ahead of time so you’ll have strips ready to go all week long. Then you just need to warm them up in the microwave or throw them on a skillet for a minute.

And now, let’s… Bring home the facon!

Ingredients

  • An 8 ounce pack of tempeh
  • 3 Tbsp maple syrup
  • 1 ½ Tbsp olive oil
  • 1 ¼ tsp cumin
  • A dash of cayenne pepper
  • 1 ½ tsp liquid smoke
  • 1 ½ tsp soy sauce
  • 1 tsp ground black pepper
Marinating facon

Jeez, Carl. Move over!

Facon assembly

  1. Slice up your tempeh length-wise, as thin as you can go without it falling apart. This can be tricky. I’d say shoot for 1/8 of an inch.
  2. Whisk together all of your other ingredients in a shallow dish.
  3. Lay the tempeh strips in the sauce and let them soak up the bacony flavor for a minute or so before turning them over and repeating the process.
  4. When the strips are good and soaked, heat up a large skillet on high, and add a wee bit of olive oil (2 to 3 tsp) or spray it with olive oil spray, before placing your strips in the hot pan.
  5. Drizzle on the leftover sauce and let the tempeh cook for a couple minutes, then carefully flip the strips over with a fork or tongs and cook them on the other side for another couple minutes.
  6. Your strips are “done” when they’re as crispy as you’d like them to be. Place them on parchment paper while they cool off.

Final tip: to make sure the cheeze is properly melty, pop the entire completed sandwich in the microwave for 20 to 30 seconds.

Bon appetite!

Heaven is a place with blueberry walnut banana bread

7 Jan

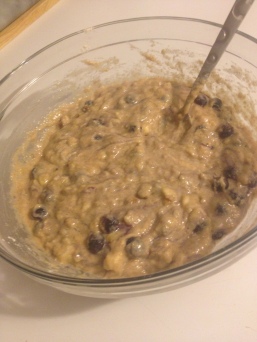
Vegan blueberry walnut banana bread.

I will make your kitchen smell divine

Has a bite of food ever made you want to weep with joy? No? Well, in that case, I feel bad for you. And also, I recommend you make my world famous (okay, my garden apartment famous) blueberry walnut banana bread.

Even if you don’t bawl from sheer tastebud delight, you’ll probably at least want to give yourself a hug after you taste your first slice.

I like to think it’s the addition of maple syrup that vaults this loaf from merely “yummy” to “I’ll punch a room full of babies for another piece” status.

On that note…Bon appetite, my future fellow would-be baby punchers!

Ingredients

Photo Jan 05, 6 31 21 PM

Get ready to mush.

  • 1 cup whole wheat flour
  • 1/2 cup pastry flour
  • 2 tsps baking powder
  • 1 tsp sea salt
  • 1/2 cup organic, raw sugar
  • 2 Tbsps ground flax, plus 1/4 cup hot water (this here is our egg replacer)
  • 3 ripe bananas
  • 1 tsp vanilla
  • 1/2 cup unsweetened almond milk
  • 1/2 cup chopped walnuts
  • 1 big ole’ cup frozen blueberries
  • 1 tsp ground cinnamon
  • 1 Tbsp organic, pure maple syrup
  • A smidgen of love and dollop hope and a dash of dreams (Just playing. Use as much of these as you want).

Get your loaf on…

Photo Jan 05, 6 44 54 PM

Just try to resist eating me with a spoon.

  1. Preheat your oven to 350 degrees and grease a bread loaf pan.
  2. In a large mixing bowl, combine the flours, baking powder, salt, and sugar.
  3. In a small bowl, mix the ground flax with the hot water to make a “flax egg” and pop the mixture in the refrigerator for about 15 minutes. This helps it thicken up for its egg duties.
  4. In another small bowl, mash the bananas before stirring in the almond milk, maple syrup and vanilla. If the thought of biting into warm banana bits as you enjoy your bread sounds as yummy to you as it does to me, leave a few lumps.
  5. Pour the wet ingredients into the dry, and mix until just combined. Note: If you over-mix your bread it will get tough, and not in the good Chuck Norris sense.
  6. Fold in the walnuts and blueberries.
  7. Resist the urge to just say “to hell with it,” and eat all the batter with a spoon. Instead, pour the mixture into the bread pan and shake it a little to even it out.
  8. Pop it in the oven for an hour to 75 minutes.
  9. To make sure the loaf has cooked through, poke the middle of the loaf with a toothpick or knife. If it comes out clean, you’re golden. Now stay that way, pony boy.

Warning: This bread is highly coveted and disappears quickly in my household. In fact, I’m off to hide the remainder of my latest loaf in a locker at Union Station. Later.

Spicy sour cream dip dreams

4 Jan

Spicy vegan sour cream dip

I’m the cute one on the left. Wink.

Punch your tongue in it’s tastebudy face (in a good way) with this super-easy-to-whip-up vegan sour cream dip of the spicy gods.

I threw this together last night as a way to 1) run through my sour cream before it went bad on me and 2) have an excuse to eat more homemade tortilla chips. Mission accomplished.

Ingredients

  • 1 12 oz. tub of Tofutti No Sour Cream Sour Cream
  • 2 Tbsp olive oil
  • 2-3+ Tbsp hot sauce. Keep adding if you like your spice. I used Tabasco.
  • 2 tsp dried rosemary
  • 1 tsp dried thyme

You dip, I dip, we dip…

  1. Mix ingredients together in a medium-sized bowl.
  2. Devour.

Happy snacking!

Stupid-easy chips and guacamole

3 Jan

Chips and guac

Dig in.

Eating vegan isn’t complex seitan shenanigans and quinoa schemes all the time, you know. Sometimes I just want a simple snack: chips and dip.

For years, I bought packaged tortilla chips, always kind of assuming in the back of my mind that the science behind the tortilla chip was so far beyond me that I should thank the gods of chip manufacturing for relieving me of the burden of figuring it out.

But, as it turns out, you can make them yourself — in less than 15 minutes, mind you — and they’ll be much tastier and a lot cheaper. Plus, you can control your portion sizes by only making as much as you (should) want to eat. This is really helpful for gals like me who like to drown their sorrows in party-size bags of salty snacks on the regular.

Anyhoo.

Here’s how you make tortilla chips…

Tortilla chips

Just pop me in the oven.

  1. Preheat your oven to 350
  2. Grease a cookie sheet (I like organic olive oil spray because I’m super lazy)
  3. Slice up as many tortillas as you wish like pizzas (I do two usually, of Ezekiel 4:9 brand)
  4. Place your little chips-to-be on the cookie sheet
  5. Spray/brush the chips with olive oil
  6. Sprinkle on a little sea salt if you like
  7. Bake for no more than 10 minutes, just until crispy (keep an eye on them, these little guys can burn fast)

Yeah, that’s it. 15 minutes will get you warm, restaurant-grade tortilla chips just begging for a dip in the best guac you’ve ever eaten (says me).

Now, make yourself some guacamole…

I adapted this recipe from acclaimed Food Network star Alton Brown, based on the ingredients I had on hand.

Ingredients

  • 3 peeled and pitted avocados
  • 3 Tbsps lime or lemon juice
  • 1/2 tsp salt
  • 1/2 tsp ground cumin
  • 1/2 tsp cayenne pepper
  • 1/2 medium onion, diced
  • 10 cherry tomatoes, seeded and diced
  • 1 clove garlic, minced

To the prep!

  1. In a large bowl, coat the avocado goo with the lime or lemon juice (this helps save it from turning a fairly disgusting, yet harmless, shade of brown).
  2. Drain the lime juice into a small bowl and save it (we’ll add it back in later).
  3. Mix in the salt, cumin, and cayenne and mash with a fork until desired consistency (I like my guac a little chunky, but keep on mashing if you like yours smooth).
  4. Fold in the onions, tomatoes, and garlic.
  5. Add 1 Tbsp of the lime or lemon juice you saved earlier.
  6. Enjoy — and share with no one! I mean, you can if you want…but why would you?

See, wasn’t that easy? If you can handle the spice, throw in a diced jalapeño pepper, like Alton recommends, and let me know how that goes for ya.

Milking Almonds

100% plantbased food 4 life

A Veganable Feast

My personal answer to the question, "Vegan? Really?? But what do you eat?!" ********************************************* Follow me on facebook at https://www.facebook.com/AVeganableFeast

What's Your Healthy

FEEL YOUR BEST

meatyveganblog.wordpress.com/

Check it out! TheSkepticalVegan.com

Better Bites

My experiments in healthy eating, cooking, and living

Gluten Free Gus

Baking Joy Into Every Gluten-free Bite

Awesome Åshild

Did You Do A "Something Every Day" Today?

Gabriel Lucatero

The Official Website

amythevegan

I'm smarter than a 3rd grader but no one will believe me.

cancer killing recipe

Inspiration for meeting life's challenges.

FlexibleVegan

Fast, Easy and Healthy! It can't get easier than this.

Awesome. Vegan. Blog.

Dedicated to health and wellness!

Vegan in Cleveland

Vegan recipes and restaurant reviews from Cleveland

The Pint-Sized Pantry

A repertoire of recipes for the cramped cook.